배경
AWS 를 통해 서버를 돌리고 있었는데, 정책 변경에 따라 과금이 발생하는 구조가 되면서, 평생 무료인 오라클 클라우드로 서버를 이전하기로 하였다.
데이터베이스는 RDS 를 사용하고 있었는데, 이전하는 선택지는 크게 3가지가 있었다.
1. 오라클 클라우드에서 제공하는 오라클 데이터베이스
2. vm 에 mysql 설치
3. supabase 서비스 활용
이 중에서는 3번을 선택하기로 하였다.
오라클 데이터베이스는 sql 문법에 차이가 있었는데, 우리 모두 mysql 문법이 익숙했고,
vm에 mysql 을 설치해야 하는 것은, vm 이 다운되었을 때 데이터베이스가 같이 내려가고, 데이터베이스에 대한 운영 관리를 직접 신경써야 하는 부담이 생기기 때문이다.
과정
오라클 계정을 받는 방법과 인스턴스 생성 과정 및 기본적인 네트워크 설정 과정(public ip 부여 등)은 생략한다.
인스턴스는 프리티어 한도에서 선택하여 우분투 OS를 설치하였다.
1. nginx 설치
https://nginx.org/en/linux_packages.html#Ubuntu
nginx: Linux packages
nginx: Linux packages Supported distributions and versions nginx packages are available for the following Linux distributions and versions: RHEL and derivatives Version Supported Platforms 8.x x86_64, aarch64/arm64 9.x x86_64, aarch64/arm64 10.x x86_64, aa
nginx.org
2. 방화벽 열기
보통 nginx를 설치하고, 서버 ip 로 접속하면 nginx 에러 페이지가 떠야 한다.
하지만 실제로는 접속이 되지 않는다.
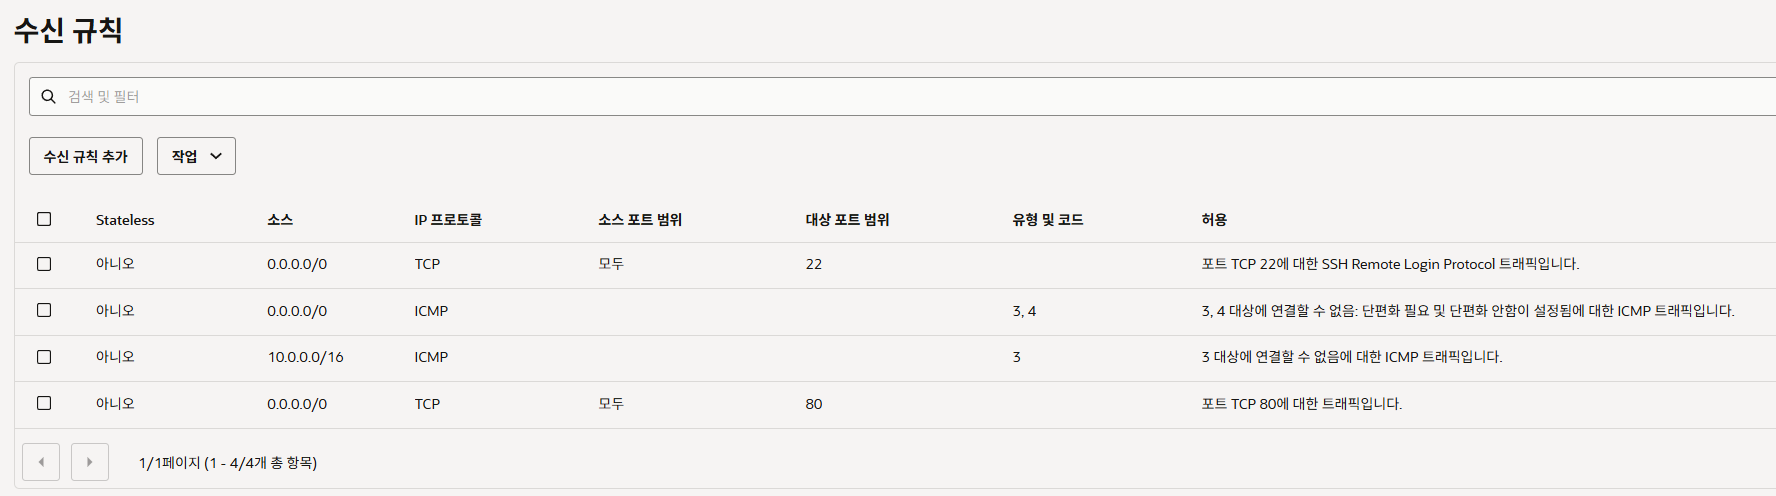
먼저 오라클 클라우드에서 '가상 클라우드 네트워크' - '보안 규칙' 탭으로 이동하여 수신 규칙에 포트를 추가한다.
지금은 nginx 테스트를 위해 80만 추가하였지만, 443도 추가해야 한다.
다음으로는 vm 내부에서도 방화벽이 닫혀있기 때문에 포트를 직접 열어줘야 한다.
보통 우분투에서 방화벽을 여는 것을 검색해보면 ufw 라는 명령어를 알려주는데, 오라클 클라우드 vm 에는 이 명령어가 설치되어있지 않고, 대신 iptables 라는 기본 명령어가 있다.
sudo iptables -L -v -n | grep :80
방화벽 상태를 조회하는 명령어를 실행해보면
    0     0 ACCEPT     6    --  *      *       0.0.0.0/0            169.254.0.2          tcp dpt:80 /* See the Oracle-Provided Images section in the Oracle Cloud Infrastructure documentation for security impact of modifying or removing this rule */
    0     0 ACCEPT     6    --  *      *       0.0.0.0/0            169.254.0.3          owner UID match 0 tcp dpt:80 /* See the Oracle-Provided Images section in the Oracle Cloud Infrastructure documentation for security impact of modifying or removing this rule */
    0     0 ACCEPT     6    --  *      *       0.0.0.0/0            169.254.0.4          tcp dpt:80 /* See the Oracle-Provided Images section in the Oracle Cloud Infrastructure documentation for security impact of modifying or removing this rule */
1068K   80M ACCEPT     6    --  *      *       0.0.0.0/0            169.254.169.254      tcp dpt:80 /* See the Oracle-Provided Images section in the Oracle Cloud Infrastructure documentation for security impact of modifying or removing this rule */
이렇게 나온다.
이 표시에 대한 해석은 별도로 정리하기로 하고, 결론은 외부에서 들어오는 80포트에 대한 규칙은 현재 닫혀있는 상태이다.
sudo iptables -I INPUT -p tcp --dport 80 -j ACCEPT
80 포트를 열어주는 규칙을 추가한다.
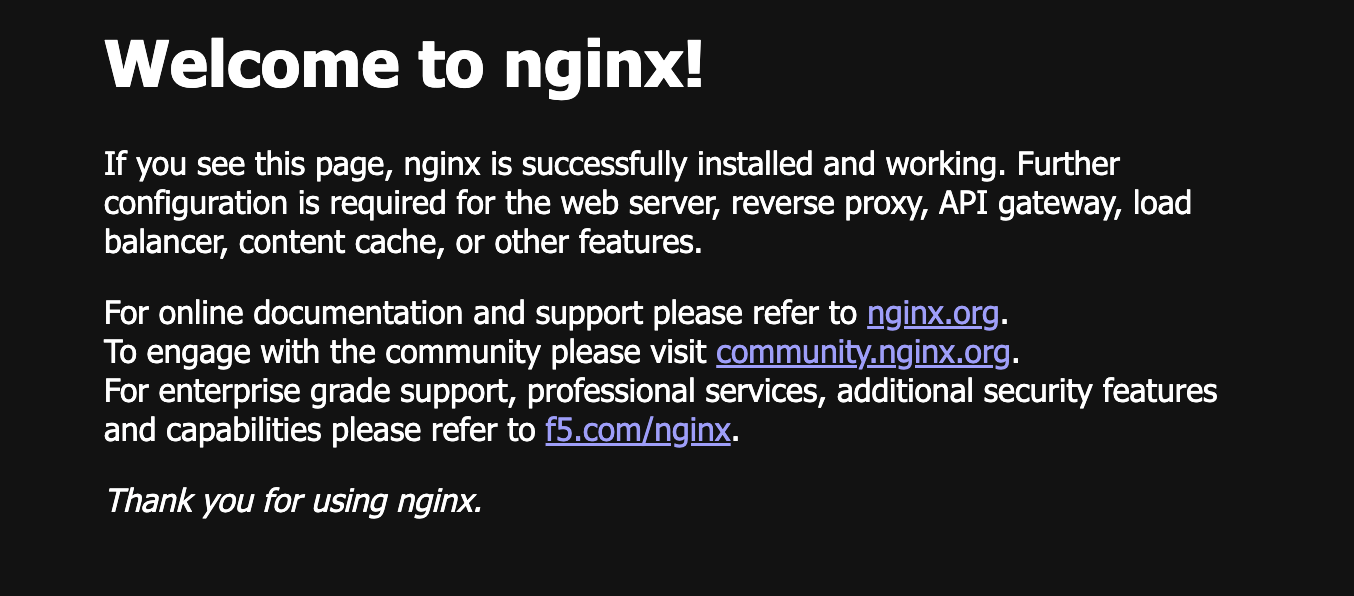
nginx 접속에 성공한다.
참고로 브라우저에 ip 주소를 그냥 입력하면 기본적으로 https 프로토콜로 시도하여 접속이 안된다.
직접 http 프로토콜을 명시한 full url 을 명시해줘야 한다.
3. 도커 설치
https://docs.docker.com/engine/install/ubuntu/
Install Docker Engine on Ubuntu
Jumpstart your client-side server applications with Docker Engine on Ubuntu. This guide details prerequisites and multiple methods to install Docker Engine on Ubuntu.
docs.docker.com
4. env 및 docker-compose 파일 이식
Termius 같은 툴을 이용하면 동시에 두 서버에 접속해서 편하게 복사 붙여넣기로 파일 내용을 옮길 수 있다.
5. docker login 및 이미지 다운로드
ubuntu@keunsori-prod:~$ sudo docker login -u keunsori

i Info → A Personal Access Token (PAT) can be used instead.
         To create a PAT, visit https://app.docker.com/settings


Password:

WARNING! Your credentials are stored unencrypted in '/root/.docker/config.json'.
Configure a credential helper to remove this warning. See
https://docs.docker.com/go/credential-store/

Login Succeeded
도커 로그인
ubuntu@keunsori-prod:~$ sudo docker compose up -d
[+] up 12/17
 ⠏ Image redis:alpine [⣿⣿⣿⣿⣿⣿⣿⣿⣿] 39.37MB / 39.37MB               Pulling                                                                               29.1s
 ⠏ Image keunsori/keunsori-server-prod [⣷⣿⣿⣀⣿⣿] 119.1MB / 168MB   Pulling                                                                               29.1s
이미지 다운로드 및 실행
6. 스왑 메모리 설정

도커를 1GB 메모리에서 깡으로 실행하면 서버가 힘들어한다.
스왑 메모리를 걸어서 메모리 여유를 늘려주자.
https://repost.aws/ko/knowledge-center/ec2-memory-swap-file
스왑 파일을 사용하여 Amazon EC2 인스턴스에서 메모리를 스왑 스페이스로 할당합니다.
Amazon Elastic Compute Cloud(Amazon EC2) 인스턴스에서 스왑 파일로 사용할 메모리를 할당하고 싶습니다. 어떻게 해야 하나요?
repost.aws
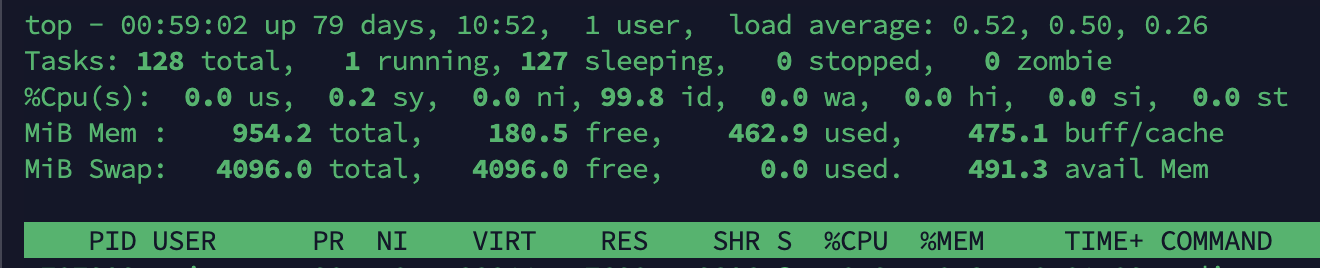
스왑 메모리에 4Gb 가 추가된 것을 볼 수 있다.
7. https 설정
지금은 웹서버가 8080 포트에서 실행되고 있기 때문에 외부에서 접근할 수 없다.
외부에서 접근할 수 있도록 바꿔주기 전에, https 인증서를 추가한다.
https://certbot.eff.org/instructions?ws=nginx&os=pip
Certbot Instructions
Certbot Instructions
certbot.eff.org
무료 ssl 발급 서비스인 cert bot 을 이용하였다.
server {
        root /var/www/html;

        # Add index.php to the list if you are using PHP
        index index.html index.htm index.nginx-debian.html;
    server_name api.keunsori.com; # managed by Certbot


        location / {
                # First attempt to serve request as file, then
                # as directory, then fall back to displaying a 404.
                #               try_files $uri $uri/ =404;
                proxy_pass http://localhost:8080;
        }

    listen [::]:443 ssl ipv6only=on; # managed by Certbot
    listen 443 ssl; # managed by Certbot
    ssl_certificate /etc/letsencrypt/live/api.keunsori.com/fullchain.pem; # managed by Certbot
    ssl_certificate_key /etc/letsencrypt/live/api.keunsori.com/privkey.pem; # managed by Certbot
    include /etc/letsencrypt/options-ssl-nginx.conf; # managed by Certbot
    ssl_dhparam /etc/letsencrypt/ssl-dhparams.pem; # managed by Certbot

}
다음으로 nginx 에서 api.keunsori.com 으로 들어온 요청을 로컬 서버로 포워딩하도록 설정한다.
sudo iptables -I INPUT -p tcp --dport 443 -j ACCEPT
다음으로 앞서 했던 것과 동일하게 443 포트를 열어준다.
오라클 클라우드에도 수신 규칙을 추가해준다.
8. 데이터베이스 이전
2026-09-26T00:55:02.174Z  INFO 1 --- [keun-sori-server] [           main] com.zaxxer.hikari.HikariDataSource       : HikariPool-1 - Starting...
2026-09-26T00:55:34.050Z  WARN 1 --- [keun-sori-server] [           main] o.h.engine.jdbc.spi.SqlExceptionHelper   : SQL Error: 0, SQLState: 08S01
2026-09-26T00:55:34.051Z ERROR 1 --- [keun-sori-server] [           main] o.h.engine.jdbc.spi.SqlExceptionHelper   : Communications link failure

The last packet sent successfully to the server was 0 milliseconds ago. The driver has not received any packets from the server.
2026-09-26T00:55:34.054Z  WARN 1 --- [keun-sori-server] [           main] o.h.e.j.e.i.JdbcEnvironmentInitiator     : HHH000342: Could not obtain connection to query metadata

org.hibernate.exception.JDBCConnectionException: unable to obtain isolated JDBC connection [Communications link failure
지금은 이전 RDS 기준으로 설정이 들어가 있기 때문에 데이터베이스 연결에 실패한다.
supabase 기반으로 데이터베이스를 이전해보자.
먼저 서버와 env 파일에서는 데이터베이스 접속 정보를 postgresql 기반 접속 주소로 수정해두었다.
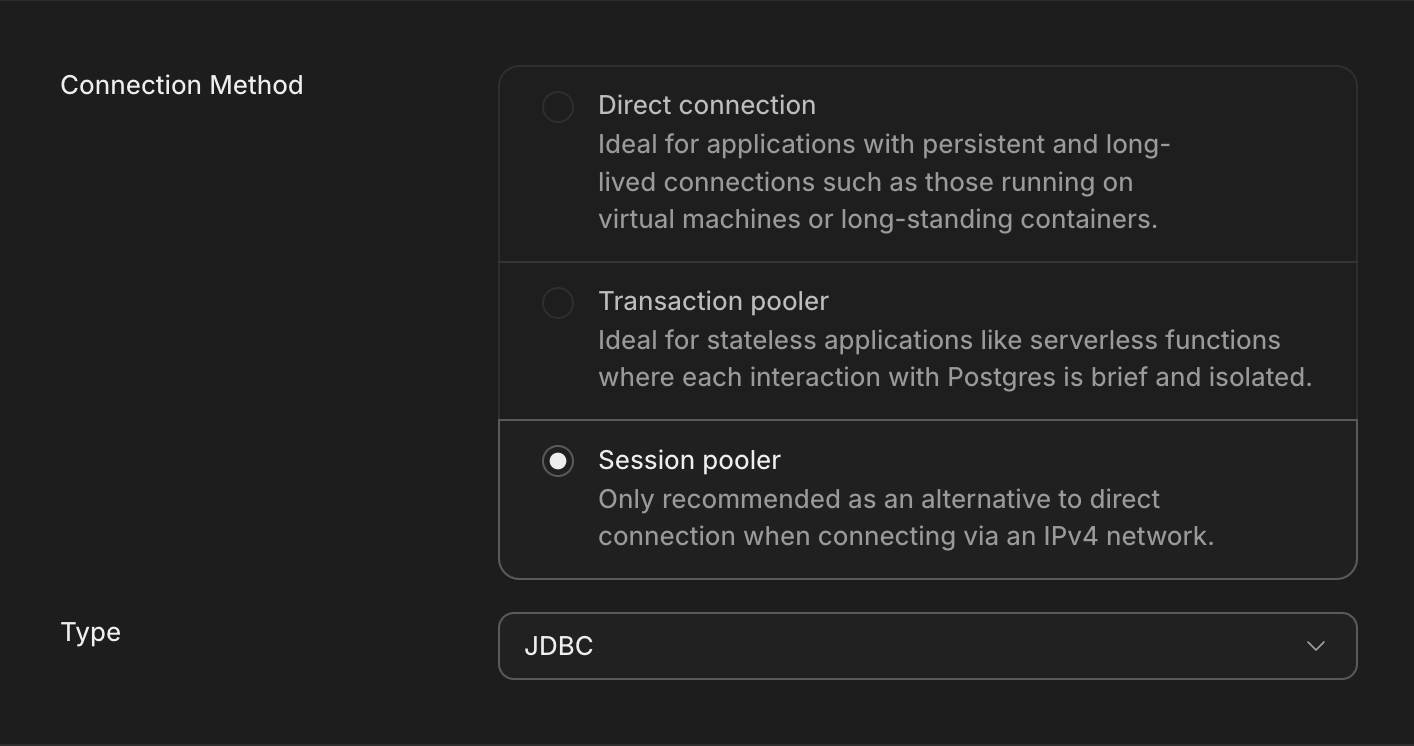
supabase 의 접속정보는 session pooler 기반으로 설정하였다.
각 설정값의 의미는 다음 링크를 참고하자.
DBeaver와 supabase connection - Inflearn | Community Q&A
host, port, username, password 다 제대로 적었는데, test connection을 하려고 하면 "no route to host"라고 뜹니다. 구글링 해봐도 해결이 안되네요. 이런 오류가 뜰 때는 보통 어떻게 해결하나요??
www.inflearn.com
spring:
  datasource:
    url: "jdbc:postgresql://${DATABASE_HOST}:${DATABASE_PORT:5432}/${DATABASE_NAME}?sslmode=require"
    username: "${DATABASE_USERNAME}"
    password: "${DATABASE_PASSWORD}"
다음으로 서버 설정값을 수정한다.
먼저 mysql 스키마를 postgresql 스키마로 변경한다.
spring:
  jpa:
    hibernate:
      ddl-auto: update
    show-sql: true
    properties:
      hibernate:
        format_sql: true
        dialect: org.hibernate.dialect.PostgreSQLDialect
jpa 설정에서 dialect 지정값이 있다면 마찬가지로 맞춰준다.
나는 .env 설정값을 수정한 뒤, 어플리케이션을 빌드해서 도커 이미지로 말아 허브에 올리고,
이관 서버에서 도커 이미지를 받아 실행하여 supabase 에 접속이 잘 되는 것을 확인하였다.
마지막으로 기존 데이터베이스 데이터를 운영 데이터베이스로 이관하면 데이터베이스 이전은 끝난다.
9. 도메인 설정 수정

마지막으로 도메인 구매 사이트로 가서 레코드 설정을 바꿔준다.
10. 프론트 연동 테스트
마지막으로 프론트에서 기존과 동일한 url 로 서비스가 잘 동작하는지 테스트 해보면 끝난다.
나는 개발서버 url 과 연동해서 테스트를 진행하였다.
'팀 프로젝트 > [2025] 큰소리 웹 페이지' 카테고리의 다른 글
| [큰소리 프로젝트] 2. 디자인 & 역할 분담 & 시스템 만들기 (1) | 2025.01.28 |
|---|---|
| [큰소리 프로젝트] 1. 팀 빌딩 & 기획 (2) | 2025.01.04 |